Since featuring SeaSucker in one of our write-ups from InterBike last fall, we got our hands on a SeaSucker Bomber rack to test for ourselves.
We have spent the past eight months putting the rack through the paces during cross season, through the winter, and during the spring racing season. The rack has been through everything Mother Nature can throw at us here in the Midwest, from snow, ice, and sub-zero temperatures to 100-degree heat.
 The SeaSucker bike racks are an innovative product utilizing vacuum cups (not suction cups) to secure the rack to your vehicle. The product’s real strength comes from its versatility and ease of set-up. The system can be quickly attached to or removed from the vehicle. Is your buddy driving everyone to the races this weekend but doesn’t have a rack? No problem; switching the rack between vehicles is quick and easy. Simply release the seal of the vacuum cups and transfer the rack to another vehicle utilizing the built-in pump on each cup. A few pumps with your thumb and the rack is ready to go, without having to install any hardware permanently.
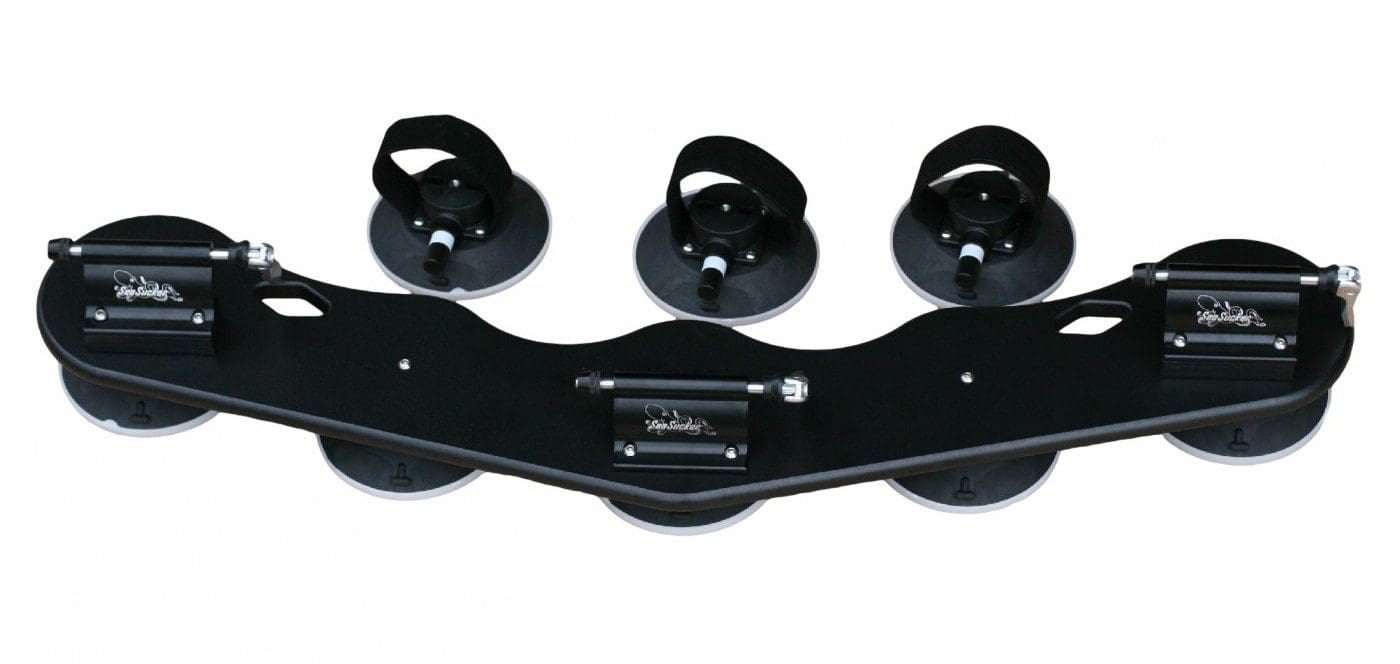
The SeaSucker Bomber roof-top rack carries three bikes (up to 45 lbs each) and includes rear wheel straps for each bike, each with its own SeaSucker vacuum mount. The rack itself is pretty simple; three heavy-duty fork mounts for 9mm dropouts are integrated into the top of the high-density polyethylene rack body with just enough flex built into the system to allow the rack to conform to your vehicle’s roofline. On the flip side, there are five 6″ SeaSucker vacuum mounts providing a secure connection to your vehicle. Each fork mount boasts an impressive 210 lb. pull-strength. The rack is about 41″ in width, 10″ front to back, and comes in at 18 pounds making it relatively light and easy to maneuver.
15mm and 20mm fork mounts are also available, and an extra SeaSucker vacuum pad and pump are also included, just in case you need a spare.
Installation
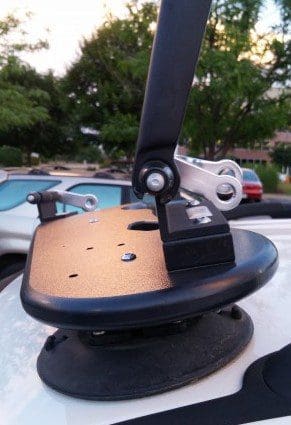
The vacuum cups hold the rack securely to the vehicle.
Mounting of the SeaSucker rack takes just a few minutes; the vacuum cups can attach to any metal, fiberglass, or glass surface on your vehicle. In addition to the roof, you can attach the rack to a trunk or hatchback. Starting with a clean surface, you add a little water to the vehicle surface or to the vacuum cups themselves. Once you align your rack where you want it, you engage the vacuum seal on each SeaSucker cup with the integrated thumb pumps.
Once you have the rack in place, you can easily attach the SeaSucker mount for the rear wheel by mounting your bike on the rack and placing the rear cup under the rear wheel for proper placement.
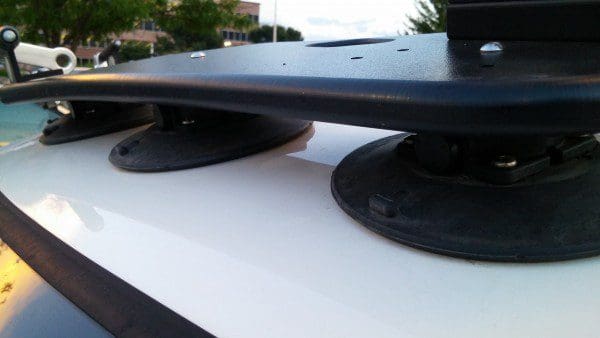
You will want to make sure the surfaces you will be attaching to the rack provide the proper space and surface for the vacuum mounts. We ran into one issue with the SeaSucker rear wheel mounts on our test vehicle. A series of raised ridges along the top of the vehicle were spaced just close enough that we couldn’t mount the rear vacuum cups to hold the rear wheel. After a little head-scratching, we were able to come up with a solution that actually worked very well. The vehicle has a rail system, which allowed us to secure the wheel using a velcro strap, similar to the strap on the SeaSucker rear wheel mounts, which we picked up from a local hardware store.
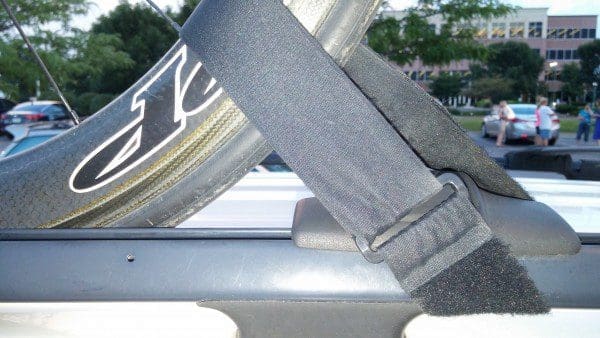
Ridges on the roof prevented placement of the rear mounts. With a little ingenuity we were able to come up with a solution.
One other factor to take into consideration when installing the rack is the temperature of the rubber cups. We asked SeaSucker about how the ambient air temperature affects the grip of the vacuum cups. They came back with the following information:
“Cold will affect the pliability of the cups. In general, you can put a warm rack on a warm car and let it get cold, and it will hold. You can put a warm rack on a cold car, and it will hold. Once the rack gets cold, though, the rubber will stiffen up. What that means in that if you take the rack off the car, you’ll have to warm it up again to around room temperature to reattach, since the rubber needs to be pliable to make a proper connection.”
So basically, as long as the cups are warm and pliable during installation, they will attach to the surface of the vehicle regardless of the temperature. The rack has been on the test vehicle since last fall and has seen temperature swings from sub-zero to 100+ and it has not had any issues with grip at any temperature, in the snow, or even ice.
Set it and, Almost, Forget It
This is definitely not a rack system you can just set-up and forget about. Even with a proper seal the vacuum cups must be pumped on occasion to maintain the vacuum seal. The pumps themselves have a smart notification system that allows you to easily, and instantly, tell if they are due for a quick refresher; if a cup is starting to lose some suction, a white indicator becomes visible. If you see some white showing, you just give it a quick pump or two and you are set.

The white indicator allows you to easily tell if the mount is due for a quick pump.
In our testing, depending on conditions, we have gone up to a week, or even a little more in some cases without any major suction loss. The system is redundant, with 5 cups so even if one cup lost suction the other 4 are there to back it up.
Security
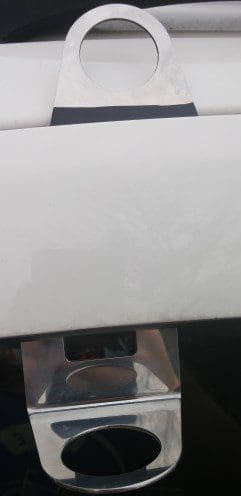
The window and trunk (shown here mounted in the door) cable anchors provide a place to run your cable lock.
SeaSucker has addressed security by offering cable anchors as an optional accessory. The anchors are stainless steel loops that can be secured in the window, door, or trunk of the vehicle.
When used in tandem with a cable-lock, they provides a level of security for your bike. In situations where you want extra security, we recommend you run a padlock through the mount lever as well.
Need for Speed
SeaSucker recommends a speed limit of 70mph when using the rack. We can neither confirm nor deny that our rack may have seen speeds a bit higher than that. This video from the company shows the rack tested at speeds just a bit higher than we were running.[clear]
Price
At $530 this roof rack is a great deal. When viewed from a per-bike cost, the 3-bike capacity Bomber comes in significantly cheaper than other 3-bike roof rack systems out there.
Conclusion
A stated earlier, the SeaSucker is by far one of the most versatile rack systems out there and that versatility is the real strength of the SeaSucker racks. The ability to quickly move the rack from vehicle to vehicle makes this system something to seriously consider if you are someone who rents cars often, has multiple vehicles, or simply wants something you can easily remove from your vehicle when you aren’t using it.
At 18lbs for the 3-bike Bomber, it is light and easy for even the smallest rider to maneuver and install. You can take it off and toss it in the garage or inside the vehicle. Their other rack offerings for single and double bike mounting options are even smaller and lighter at 6 and 12 pounds respectively.
If you are someone who is looking for a rack system that you can leave on your vehicle and forget about, this probably isn’t for you. While only needed every few days to a couple of weeks, you will need to periodically pump the vacuum cups to retain their seal. We haven’t found this to be an issue for us as the indicators provide an easy reminder and we simply hit the pumps a few times as needed when entering the vehicle.
We had the same initial hesitation as most people about attaching thousands of dollars worth of bikes to our vehicle with “suction” cups but after 8 months of testing with no issues, we can’t really find any outstanding fault with the SeaSucker Bomber rack. It is a solid system that is easy to set-up and as versatile as you are going to find. The rack is great and we plan on getting plenty more use out of the rack.


